Wednesday, August 1, 2012

DIY How To Make A Cat Toy


This is a fun and easy project to embark upon on a lazy weekend with a handful of close friends, or solo. Using things you may already have close at hand will get you through this project and your furry feline palm will be ever thankful.

TOOLS


Scraps of Material: I have a bag that is full to the brim of scraps, leftover from previous projects. This is the PURR-fect way to use them up. If you find yourself lacking in his department consider chopping up a couple of old tee-shirts or hit the thrift shops and scour the $1 racks for interesting prints.

Scissors, Fabric Chalk Thread & Needle: A good set of fabric cutting scissors will get you through this project and many others. Invest in a simple pair at your local thrift shop and vow to only use them for –cutting fabric. Fabric chalk can be used to draw out the shapes but I find it is not necessary, freestyle works just fine. If you do not trust your freestyle cutting skills, a white colored pencil or even a piece of bar soap will work in a pinch. Thread in a few shades, a good needle and some time is all you need. I used a whip-stich to sew the body and I definitely recommend that you make your stiches nice and secure. Especially on the eyes and ears, we do not want kitty to be able to take it apart during some overzealous play.

Batting: The actual stuffing of the project. You can find this in a fabric store and generally a big bag of it. More than what you may need for this project. To save cash consider using cut up pieces of your scrap fabric to stuff the toy with or even some cotton balls. 

Optional: Bells and catnip are fun things to add on if you’re feeling feisty.

TIPS


I started with a four by four inch square for my mice, but you could go bigger or smaller.

Once you get a mouse or two under your belt, would it not be fun to switch up the design and come up with your own toy? A little bird or bat could be fun!
Consider textures and what your cat loves when you start making your mice. Some cats love rough textures, some love a good feather or even metal [ I used a leftover piece of zipper for a tail. ] Some love a good squeak; you can find squeakers at pet shops and put them inside your mouse for a bit of noise. A cat or two may enjoy that crunchy noise, so you can add some crumpled paper inside to get that effect.
Above all have fun making a little something for you beloved feline pal; they will love you back twice as much.


Tuesday, May 1, 2012

Collective Haul


The Title sums it up, a big ass collective haul from all the stores I went to during early March. 
Enjoy.

BlueFox

Monday, April 30, 2012

DIY - Jewelry Box


{ This is what it looked like before the stain. }

Got an old jewelry box laying around? Let do something with it!


TOOLS

An Old Jewelry Box, for this project I used one I found at the thrift shop.

Wood Satin: Find a color you like at Lowe's, Home Depot.   

Sand Paper: Fine grain find at Lowe's, Home Depot.
Sponge Tip Paint Brush: One for the stain, one for the decoupage. 


News Paper: Use lots to keep your work area tidy.
Decoupage Medium: Find at Joannes, Michaels or craft and hobby stores.

A Pencil & Popsicle Stick: A pencil can help you mark the place where you want to place your picture. A Popsicle stick can help flatten then picture the first round, to avoid air bubble underneath.


Picture of Your Choice: I printed my picture out, if  you do this I suggest multiple layers of thin coats a top the photo. This will keep the ink from running. Test run a photo before you do the project to see if you can pull it off. I did about 6-7 thin layers on my letting them dry for a while in between. You can also use fabric, magazine clippings, etc.


TIPS 

Do this project when you have plenty of spare time.
Do this outside -no exceptions-
News Paper is your friend.
Don't want to use stain, try painting it or use spray paint. 
Tape: Use if you want to protect the hardware of the jewelry box. Put tape where you do not want paint. 


Catch ya later...
BlueFox


Sunday, March 4, 2012

DIY Fashion Accessories - The Button Projects


 The Tools

Buttons: Find these guys super cheap at yard sales, swap meets and thrift shops. You can also head to your local fabric or craft store to find some interesting buttons. 


The Glue: E-6000 is a wonderful glue for projects. You will need to work fast with it and cap it once you are done. Glue sets up in about an hour or two, so you have a little bit of wiggle room to make any adjustments. The fumes are strong, use in well ventilated room or better yet outside. Glue will set permanently in about 24-48 hours - so give your project proper time to dry.


The Hardware: All found at your local craft or fabric store. Earring backs whether clip on or post, are dirt cheap. Usually a bag of 20-30 for about $2. The tack pins where sold in a bag as well for about the same price. The stretchy ring with flat face was the only hardware that cost me about $4.


TIPS


Newspaper is your friend, lay it out on your working surface to avoid a mess. 

When you cut the loop off, close your eyes or better yet wear eye protection! I had pieces of buttons flying everywhere.

Metal Button? You can still use them, matter of fact one  of my "pins" is a metal button. You will just need to work it a bit more with the pliers to pop the loop on the back of the button off. 

Try one project at a time, until you are comfortable with the process.  

Allow proper time to dry, it would be awful to have your button fall off. 

Make them for friends & family!


 Check out the video for the full breakdown. 

Got any questions? I am happy to help
 personal message me on Face Book


Catch ya later my friends,
BlueFox


Sunday, February 26, 2012

INTOLERABLE CRUELTY


Glad I am not the only one to sing along to songs in my car :]
Geoffrey Rush's Donovan Donaly


Can I just say the house that belongs to Rush's character is GORGEOUS! Everything the tiles, furniture...  .. .


Hand Shot, because they are HandSome


Even though Mr. Rush is only in this film for a very few short segments, he is flippin hilarious! His facial expression are off the charts funny. I actually watched Jim Carry's The Mask the other day, then I got these pictures ready. I realized that Mr. Rush could have easily pulled off that movie.


Rush Sandals


Actually wearing a wedding band...


 In this scene he curses up a storm, and I got to say I LOVE hearing him say bad words, its hilarious. I replayed that scene over and over, literally laughing out loud.


 Blog IS NOT complete with out vain butt shot picture posted.


 That beard reminds me of someone... .. .


 Foot Shot = Foot Fetish


 Since this is such a short post I will pick this review to talk about something I have noticed about our dear Mr. Rush. Lets call it the... .. .

"Trifecta Of Rush"

He has a tendency to say things three times, for effect.

Example

"Yeah Yeah Yeah" Casanova Frankenstein - Mystery Men

"No No No" Harold Fingleton- Swimming Upstream

I have also heard him say 

"Yes Yes Yes & No No No" As I watch these movies again for the umpteenth time I will come back and add to this blog post. Because I know they are there.

Until Next Time My Rushies,

Blue


Friday, February 24, 2012

For The Love Of A Pirate ~ I Wear My Heart On My Sleeve


{Hat Wal-Mart, Sweater Old Navy, Jeans Target, Shoes Fergalicious by Fergie, Clutch Rue 21}

This is definitely a project I wish I would have gotten up a lot earlier. I know its still cold out there in certain parts of the world so here you go!

First off this a quick way to personalize your wardrobe. Breath new life into an old sweater with ease.
WHAT DO YOU NEED FOR THIS PROJECT
Inspiration: What or whom do you love right now? {A Pirate} 
Do you have a favorite saying?
It can be anything like "WTF" or a funny quote, anything you want.
Be creative & have FUN... .. .
A Sweater: Mines a cropped waffle knit, I found at Old Navy this year. Search thrift shops and other stores for the perfect sweater. The only thing I'd say avoid a heavy cable knit with like braids or cording wherever you are going to personalize. Could get in the way.
Yarn: Your choice of color, contrast is best. Find at the fabric or craft store for a couple of bucks.
Scissors & Tape measure: Tape measure is very  important, you need to count how many letters are in your particular statement. "Barbossa" has 8 letters. I measured out "8" 2 1/2 inch spaces and marked where every letter should begin and end.  Use some tailors chalk or a pencil to make your marks. You can free style BUT make sure you will have enough room to be creative!
Needle with a large enough eye or hole that yarn can pass through. Mines a tapestry needle which I found next to the knitting needles and yarn.
Time: About an hour to do mine.


TIPS
Do not pull on the yarn to hard, it will cause the sweater to bind up.
For straight lines you can make your stitch bigger, but for curves keep it smaller. Its easier to get a nice curve. If you make a mistake, and your needle is easily pulled back out-do so. I did a couple of times when I did not like the angle. 
If you are going to take the time to do this to a sweater also take the time to hand wash it!
Be careful when you put your sweater on, if your finger or hand catches the yarn on the inside it can pull.
If the yarn gets Gap-y or squirrely, thread a normal needle and add a couple stitches to keep it where you want it.
That's it for this project ~ Catch ya later,

BlueFox

Sunday, February 19, 2012

DIY Fashion - How To ReMove Shoulder Pads


Tools you will need, a tread ripper or can be called a seam ripper. find this little guy at yr local fabric shop. This tool is a must for any DIY person worth their salt. Not only can it help take things apart but it can take buttons off or even help fray some jeans.

I bought this blazer and showed it on a prior haul video, if you want to see that it looked like prior to the revamp-check this out,


I did take some still pics, but alas the new computer has no picture editing software yet. I may post them later. I only have video editing software and did ye notice the clarity on the new video? My 1080 HD is BACK! Takes forever to render and upload but for some videos it is worth it!

Catch Ya Later,

Blue


Kardashian Kollection - Navy & White Pant Suit


So here it is the most comfortable pantsuit in the word!
Made by the Kardashian Kollection for Sears.


PROS

The material is serious luxury. Cool to the touch, moves like chiffon.

The color dark royal blue, perfect for the summer trend of Navy & White.

Comes with a white belt of which I opted not to add this time around.


CONS
Its too long! the legs are literally three to four inches to long. My legs are decent length here, I'm six foot plus with theses heels on and they pant legs are dragging on the ground.
Easily fixed with a small alteration.


The cost, why do they have to make their line so expensive? This was def a splurge for me I have not spent THAT much $$$ on an outfit in a very long time. I have to really love something to plunk down the cash - if its a bit pricey.


I will catch ya later my friends...

Blue


Saturday, February 4, 2012

DIY Fashion Thrift Shop Dress Revamp / Recycle Clothing Project


So I am starting to feel like normal now. I caught a cold and felt like the walking dead for the last two weeks. I had recorded the first half of this video right before I got sick and it took me this long to finally get pictures taken for it, sadness. I wanted the hubby to help me with this one because I had a location in mind that would have complimented it beautifully. But he bailed out on me, I should have known better to have even asked for help, sadness again.


Slightly Veronica Lake...?


Finally able to post this I initially showed this dress on a haul video a few uploads {You Tube} ago. I had plans for it to become a skirt. It was just too much as a dress, very Victorian and stuffy. More then anything the color was too close to my hair color and I felt like a blond blob. SO I took scissors to it and documented the revamp in the following video for you.


TIPS
Measure before you cut. Simply laying the fabric down and cutting both sides at the same time = a BIG No NO. The material will slide as you cut and it will not come out even. Speaking from experience here


One more thing to consider. My dress had an elastic waist band already, so I kept it. I still have to pull it on over my head just as I would have if I kept it in dress form. You may need to add elastic to create a waist or a zipper. Think  about it before you cut it.


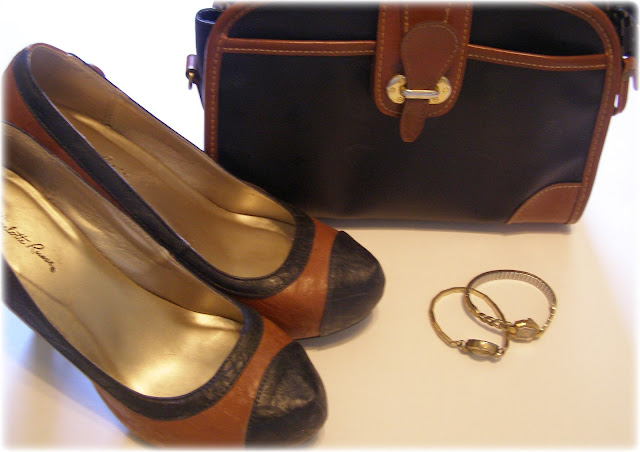
As for the video details. The coat is vintage I have had it for 10+ years. I found it in a Sacramento Thrift shop for $10. Every time I wear it I get compliments or looks. One time some lady tried to buy it off of my back! No Joke. Added a brown tank, lifted the skirt to make it high waisted. Shoes, are from Charlotte Russe and they are actually a couple years old! Not bad. Purse is a thrift-ed find. Watches where my grandmothers. 


The camera was my grandfathers. He was a photographer for the army. This was one of his cameras I found in a survival backpack that was in a shed. At the time I was in high school and to find a survival backpack, I had no concept what it really was. What he lived through. I kept the camera and the alarm clock you see in one of my other videos. I also have masses of black & white photos from him, of everything. My Grandmother, Father as a baby. places in France and Germany, everything you can imagine. It really blows my mind to sit here and think about the fact that I have become so enamored with photography as of late. What I could have learned from him if he where still around, amazing. The camera smells like leather when I lift it to my face and reminded me of him every shot I took. 


Yes look at the duality of it, taking a picture of myself taking a picture... .. .


Enough rambling on until next time my friends,

BlueFox


P.S. &&& to those boys who thought they where cheeky playing football right where I was shooting! Thanks A lot... 


Rate Thumbs Up , Comment & Subscribe to Support!